
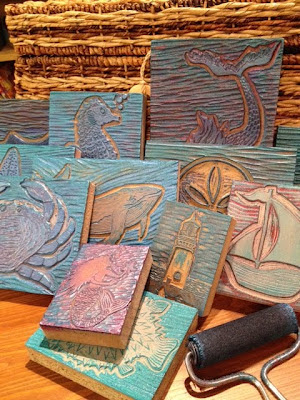
In case you haven't noticed, our giveaway right now is a set of 7 beautiful hand-printed dishtowels from Deanna of Salty Style. When I was setting up the giveaway I asked her to send me a picture of the printing tools she uses.
That picture was so intriguing that I asked her if she would write a whole blog post for us (okay, mostly for me) showing the process. I'm so thrilled that she did, and I can't wait to try it.

That picture was so intriguing that I asked her if she would write a whole blog post for us (okay, mostly for me) showing the process. I'm so thrilled that she did, and I can't wait to try it.
So here you go... Deanna's tutorial for block carving and printing:

Before taking a block printing class in college, I was beyond intimidated by the printing process. Quickly, I learned that aside from being soothing, carving and printing were easier than I imagined. Now, in response to questions about carving blocks, I encourage those curious to give it a try; it's a hobby that anyone can enjoy. Really!
You'll need to sketch a little. If you think you're not the artistic type, don't run away! Drawing is another subject, but you can do it. Just think of something that inspires you. (I'm wild about anything ocean. Feel free to check out more prints!) Look at pictures, and loosen up on that pencil. Forget about straight lines and perfection. Scribble, doodle, and have fun. The first step? You'll need a block!
I work with linoleum; strong enough to take the beating of constant printing and scrubbing since the fabric paint I use is quick setting. Blocks are cheap, and are available pre-cut in various sizes. In our little town of Astoria, Oregon we're fortunate to have an art store with a good supply of printing materials. You can shop at Dots N' Doodles too.
After choosing a block size, you can either sketch straight onto the line, or on paper. If you choose to draw on paper (this is the easiest way to transfer letters, rather than writing backwards) use a fairly soft sketching pencil. Place your drawing over the block, face down, and rub the paper with a wooden spoon. This should transfer your drawing, and you're ready to carve! I chose a simple anchor sketch; easy!

Time for carving tools! Everything you need to get going, you'll find in this starter kit by Speedball. Before you begin carving, take a second to think about positive & negative spaces. You can always just carve along your lines, keeping it simple. I'll be carving texture around the anchor, cutting the lino out around my sketch, so the anchor will remain solid.
Be cautions. Always cut away from your body & appendages!

Since I also print on soft fabrics, my lines are deeper than they need to be for printing just on paper.

When you feel like you're done carving, it's time to print!

You'll need a flat surface for rolling your ink. I use a glass cake plate. Just squeeze a little ink onto your smooth surface, roll the ink around with your brayer, then roll the ink onto your block.


Place your block onto paper, or paper onto your block, and rub the paper with a wooden spoon.

Peel the paper off, and Voila - your beautiful creation! You are now a block printer!

Easier than you thought, right? Have fun, and print away! I would absolutely love to see your masterpieces; post them on Salty Style's facebook page! I'll do my best to keep the new prints coming too.
No comments:
Post a Comment