Sunday, September 9, 2012

Hooded Towel Inspiration

Hi there everyone!! This is Sarah from Blue Susan Makes. Caroline is still on her little vacation, lucky gal, so I thought I'd pop in and give you a little hooded towel inspiration.


I was so excited when I saw that Sew Can She was featuring a Hooded Towel Tutorial.  I love making these for baby shower gifts.  They are so easy and they always turn out so cute!  You can add a coordinating fabric to the hood, just layer it on top of the towel triangle before you put it together.  Another little thing I like to do is make the leftover towel into a matching washcloth.


Here's one that I added a little animal appliqued to.


The creative options are endless! 


Happy Sewing!

Thursday, September 6, 2012

Search our site!


I'm so excited about this new development on Sew Can She, I could jump up and down. I've been wanting our site to have its own little search engine for quite a while now, and finally we do.


So go ahead, visit the Search Page, think of something you'd like to make, and search for it!

Or is there something you once saw featured and now you can't remember where to find it? Use our new search!

Some of my favorite searches are 'ruffle,' 'bag,' and 'quilt.' I love seeing those adorable tutorials again!


Today's just the first day, and we're still working on making sure everything in the archives is properly tagged for searching. Please let us know if you have any suggestions for ways you would like to search. It will get better and better, but for now let's just celebrate the search!


Happy Searching and Sewing,

post signature

Tuesday, September 4, 2012

Me - looking silly trying to look cute

Last winter I featured a fabulously cute tutorial for an earwarmer by Delia of delia creates. {Here's the direct link. And here's the link to our 'Self Love' archive page where it also sits.} She looked so dang adorable in that earwarmer that I decided to make one for myself. I'm not going to post pics of Delia in her earwarmer here, because I think that would make my own pics look even sillier than they already are.  
Am I a mannequin?
What's the deal with all those people on fb and instagram and EVERYWHERE who take cute pictures of themselves? I tried for like an hour and came up with just a bunch of silliness.
Pointed camera too low
Pointed camera too high.
Finally noticed the red strings in my hair. :/

This one really shows off my ear warmer, (which did turn out fabulous) but could I look any cheesier?

BUT... I did find a way to make my terrible pictures look way better...
image editing software. 
Check it out...


I'm sure I could use photo shop to somehow get rid of that string, but then you'd KNOW that this was altered.

{by the way, this would look so sweet using striped knits from Girl Charlee... enter our current giveaway to win any three yards!}

Nighty night!

post signature

Saturday, September 1, 2012

Sewing 'Spooky Dresses' for Fall


Last night when I was putting my girls to bed I told them that I'd finish up their 'spooky dresses' and in the morning we'd take pictures. So then this morning I was woken before 7 by Chloe (my 7 year old) asking for me to do her hair. What? It's Saturday. And then I realized she was already wearing her dress and so was Cadie.

So I got up, did Chloe's hair in two little buns, brushed the rat's nest out of Cadie's curly mess, and gave her buns too. She wanted 'big buns,' lol. Then we went out to the back yard for a few pics. I promised my friend Jodi of Jocole patterns that I'd show her what I did with her 'Mix and Match' patterns.


I was totally inspired by these purple and black printed knits that I ordered from The Fabric Fairy. Can you see the spider webs on the purple print below? That's why we call them the 'Spooky Dresses.'

When I got these fabrics I realized how sweet they looked with the little black polka-dot fabric that I purchased from Girl Charlee this summer.


Sorry, this has nothing to do with a free tutorial at all, just my personal sewing for fun. I will be so sad if (should I say when?) my girls ever get too old to like the things I make.


After our little 'photo shoot,' Chloe and I headed off to the fabric store to replenish our stash for more fall sewing.


What about you, any fall sewing?


post signature

Thursday, August 30, 2012

Making the One Hour Bag


Earlier this year we had a sew-a-long making this adorable purse. It was tons of fun but since we didn't have a blog back then, I didn't get to show off the beautiful bags that everyone made.

The tutorial we all followed (to one degree or another) is Ric Rac's One Hour Bag. The link to this tute is also found on our 'All Patterns and Tutorials' page under the 'Self Love' category here.


This is my bag. I used a home decor weight jacquard for the exterior and some Amy Butler Love for the lining and one side of the strap.


My favorite part is the way the strap goes on. Instead of having to put it between the bag and the lining, you sew it on afterward. Then you put big fabric covered buttons over the stitching. At least I used big fabric covered buttons.

And I put a magnetic snap on the inside.


Here's a bag sewn by my friend Angie. She also used big buttons (and fussy cut the fabric first - adorable!). She added a strap closure to the outside.


This one was sewn by my friend Andrea. Such cute fabric!


And the rest of these were sewn by other Sew Can She fans...


by Svalgoma


by handmade by jessica


and by outbutnotoutdone.


What have you made using tutorials we've featured? Post your pics in our flickr pool. Maybe you'll see them on the blog sometime!


Here's just a little pic from my Instagram today... 


It's my daughter Cadie with her bestie Katie (both pronounced the same). They fight way more than play nicely. We hope that if we keep telling them they're best friends it might be true by the time they're 7 or 8. :)


Happy Sewing, 
post signature

Monday, August 27, 2012

Sewing Ruby's Simple Washcloths


I have a baby shower coming up on Saturday so I thought I'd try out Ruby's adorable Simple Washcloth Tutorial. It's also in our 'Home Love' archives here.

Oh my goodness, what fun! I have tons of cotton fabric around, but I had to make a trip to the big-box fabric store for the cotton chenille. With a coupon I got 1/2 yard for under $3. Yay! 


When I got home I realized that the pale blue chenille (the baby is a boy) would look just lovely with my organic cotton scraps from my last Fabricworm project. 


The biggest change (if you could call it that) I made to this tutorial was using a 7" inch template instead of 6". I really like the size. Maybe I am too used to cutting squares with a ruler and rotary cutter, but this tracing and 'sloppy' cutting was a blast. I could even watch TV and do it!

So here are my 'supplies' all set up next to my machine. Sewing them up was a breeze.


My only annoyance came during the topstitching. I insisted on sewing them with the quilting cotton side up even though my feed dogs didn't work very well with the chenille on the bottom. I thought using my walking foot would help, but it didn't :(. I know, I should have just tried turning them over, but I'm stubborn.


I'm so excited to give these away on Saturday and hear everyone ask, 'you made these???' 


post signature

Friday, August 24, 2012

Oilcloth Pencil Cases - My Version :)


We've only had 2 weeks of school, but I can already tell that my kids have been assigned really great teachers this year. So even though teacher gifts are usually given in the spring, I wanted to give them something now. Hey, why wait until the end of the year to sweeten them up?

 The original tutorial is on Miss Make's blog here and archived in our 'Crafty Love' section. Be sure to read that because I'm not going to show every step, just the ones that I changed.


Interruptions


This is one of those 'while you're at it' projects that is so quick to make you might as well sew more than one. I cut out and stitched up 6 in just a couple hours... with interruptions. 


Laminated fabric or oilcloth (as it is also called) has a thin layer of vinyl fused to the right side. It is different from PUL, which has the vinyl on the wrong side. They're both pretty handy (for different things) and since they're laminated on one side, they won't fray at the edges.


This fabric is a super 58-60" wide, but the laminate doesn't always make it all the way to the selvage, so you'll have to trim the edges where there's no vinyl.


Here's where I started to deviate from Miss Mary's tutorial. Instead of cutting two pieces of oilcloth for each pencil case, I just cut one and planned to fold it at the bottom of the case. I know, lazy. I'm just getting started.


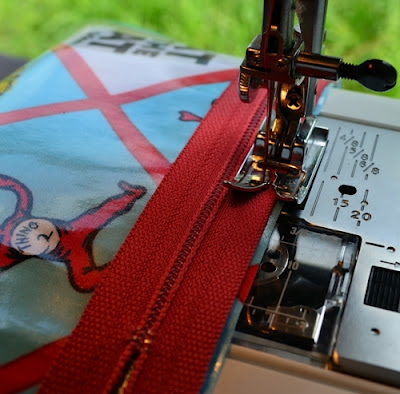
Next, instead of folding the edge over and sewing it to the top of the zipper, I placed the open zipper on the top of my oilcloth piece and stitched them right sides together.

Lazy alert: I don't have a sewing machine foot fetish that makes me change feet all the time, so I just used my regular foot here. I moved my needle over to the left and then sewed with the edge of the foot against the zipper. Do whatever works for you and helps you make a straight line.


You will have to close the zipper about half way down so you can finish stitching without your zipper pull getting in the way.


Then, if you are using my method, fold the other end of the oilcloth up and sew it to the right side of other zipper tape.


I put a folded piece of ribbon in one side seam to make a little loop for hanging or whatever.


If you want the top of your zipper to stick up and form a square corner like mine, be sure to fold the zipper tapes up before you stitch your side seams.


And there you go. These are perfect for pencils, markers, crayons, or whatever doo-dads you can think of.


Happy back-to-school,

post signature